Digital Environments: Design, Heritage and Architecture
<< Contents
|
Digital Environments: Design, Heritage and Architecture |
<< Contents |
Gareth Bradshaw and Rachel Moss
Towards a Prototype for the Collection of Digital Medieval Moulding Profiles
Keywords: mouldings, profiles, laser triangulation, structured light
Introduction
Throughout the Middle Ages mouldings of various forms were used to emphasise the salient parts of buildings. Over the last two centuries architectural historians have demonstrated how moulding formations were utilised in a relatively consistent manner, whereby combinations of different types of moulding, forming a set 'grammar', passed in and out of fashion. This evolutionary characteristic theoretically enables modern scholars to gauge both the rough date of construction for an otherwise undated building, and to establish building chronologies within individual structures. Furthermore, because individual masons or groups of masons were responsible for the initial design of each moulding formation, it has been argued that the study of mouldings can reveal personal styles and thus provide information on the work patterns of individual builders. [1]
The study of mouldings is largely reliant on comparative analysis of profile drawings. This methodology requires large samples of profile drawings to provide a reference against which others can be measured. Recognition of the importance of moulding profiles in the field of medieval architectural history is not however, reflected in existing archives of such drawings. This is due to difficulties both in the acquisition of accurate sectional drawings of mouldings in often quite inaccessible locations, and the subsequent retrieval of relative comparable data.
Traditional methods of acquisition, involving the use of a template former or measured offsets, necessitate physical contact with the surface of a moulding [2]. This is relatively simple when data relating to features such as base moulds is being collected, but becomes problematic if the profile of an inaccessible rib or clerestory arch is required. The act of collecting and transcribing the forms is also time-consuming, particularly if a comprehensive survey of a building or group of buildings is being undertaken. The storage of large quantities of scaled profile drawings, cross-referenced in a way that facilitates comparison between moulding sequences across a wide range of features has also proved problematic.
A collaborative project between the departments of Computer Science and History of Art at Trinity College Dublin aims to address the difficulties of profile acquisition and archiving, with the formation of a database of Irish medieval mouldings as an ultimate goal. This paper outlines the initial phase of the project; an exploration into the use of computer technology as an accurate, consistent and flexible means of profile acquisition.
Requirements
For the purposes of comparison, a digital archive of moulding profiles requires a bank of consistent, accurate data, which is amenable to statistical analysis and verification. The mechanism for collecting such data should ideally operate using simple, cost-effective technology and require a low amount of user expertise. It should be highly portable and sufficiently robust to withstand use in outdoor conditions, although for experimental purposes this is not required. The provision of a recording method that does not require contact with the surface of the stone is also preferable, permitting greater access to awkwardly positioned mouldings, and reducing the risk of damage to friable material.
The Prototype
Following a survey of techniques to evaluate the application of computer technology (namely machine vision) for the acquisition of moulding profiles [3], laser triangulation was chosen for practical evaluation. Laser triangulation is a relatively simple technique, which can yield high accuracy. It also allows the construction of a prototype system using off-the-shelf components, which facilitates experimental design.
Operating Principles
The system operates by using structured illumination and triangulation. Basic triangulation can be performed by projecting a dot (generated by a laser) onto the surface and using a photo-sensor (plus focusing optics) to register its position. As the illumination is applied from an angle (relative to the line of sight of the sensor), it moves across the sensor as the distance to the surface (depth) changes. The sensor effectively encodes the position of the illumination as its output signal (voltage, current etc.) [4]. The angle at which the applied illumination is observed (and the focusing optics) can be used to control the accuracy and range of the system, although there is a trade-off between range and accuracy.
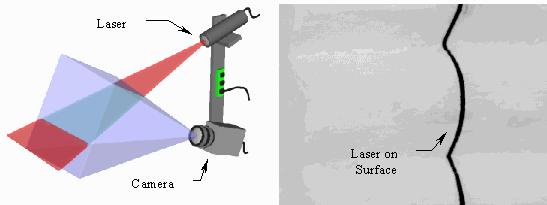
For our purposes this type of configuration is less than ideal as it provides only a single reading for each positioning of the unit. A more suitable configuration is to perform a set of measurements simultaneously, similar to the operation of the template former. This can be achieved by using a commercially available laser line generator1, which projects a line onto the surface instead of a single dot. To take multiple measurements multiple sensors are required. To do this a CCD camera can be used to observe the laser (Figure 1a). The image from the CCD sensor (Figure 1b) encodes the measurements as the horizontal position of the bright strip, and a measurement can be taken for each line.2
Figure 1: Configuration & CCD Image (Inverted)
One of the major advantages of the CCD camera is the availability of an entire image of data, this allows image processing techniques to be used to remove noise and extraneous reflections. Also the wide variety of lenses available for the camera allows the configuration to the tuned easily.
Calibration
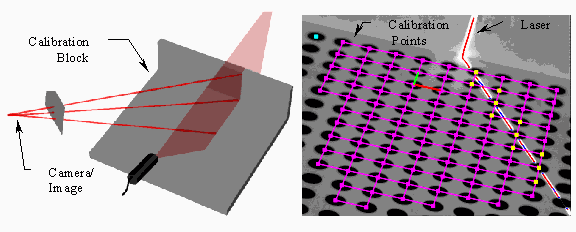
In order for the system to operate, it is necessary to model the image formation properties of the camera, and the way in which the structured illumination (laser line) is applied. The camera is modelled by TSAI's camera model [5], a general-purpose camera model that includes both perspective projection and radial distortion.3 To solve for the parameters of this model, it is necessary to obtain a set of points for which real world positions (relative to some origin) and image positions are known. This is achieved by presenting the camera with a pattern of dots (Figure 2b), where the dots are arranged in a grid (so their relative positions are known). The parameters are then found by iterative optimisation [5].
The laser triangulation is modelled using the ray-intersection model [3]. Thus the laser is modelled as a plane onto which the bright spots are projected. In order to find the equation of the plane it is necessary to obtain a set of points that lie on it. These points are obtained by observing the illumination of a pair of reference planes through the camera. The laser points in the image are projected onto the reference planes, resulting in an 'L-shaped' set of points that lie on the laser plane, which is then found by Bi-Variate regression.
In the interests of reliability, both calibration steps are performed simultaneously. A calibration target, consisting of a right angle block on which a grid of dots is printed, is positioned so that the laser illuminates both the reference planes (Figure 2a). A calibration image, taken by the camera, provides both the camera calibration grid and an 'L-shaped' set of laser points (Figure 2b). The two data sets are separated by selecting thresholds that categorise image pixels as laser, dot or background.4 As the two patterns interfere with each other, it is necessary to discard some of the dots, as their reliability may be compromised by their proximity to the laser (and vice versa).
Figure 2: Calibration Set-up & Image
Profile Segments
The scale and shape of medieval mouldings (as with any surface) generally prohibit the capture of the entire profile. As the scanner has a limited field of view it is usually not possible to fit an entire moulding within its viewing area. While this can be remedied by increasing the field-of-view (and range) of the scanner, the adjustments to the scanner would reduce its accuracy and thus is not desirable. The second problem, one not alleviated by adjusting the scanner, is self-occlusion caused by the surface of the moulding folding beneath itself, which prevents the laser from illuminating the occluded areas. These two factors often make it necessary to capture the profile in a number of segments, which can then be aligned (registration) and stitched together to form a complete profile (merging).
In order to combine profile segments, the relative positions of the data segments need to be determined. Initial work involved the use of a position tracker (Polhemus IsoTrak-II). This is an electromagnetic device that determines the position and orientation of a sensor (mounted on the scanner) relative to a fixed reference point. Under favourable conditions (i.e. in the absence of large metallic objects) the tracker provides reasonable accuracy, however as the working envelope of the scanner is positioned approximately 1 metre in front of the scanner any error in orientation is amplified considerably. 5 As the accuracy of the sensor is limited and as power consumption6 and equipment are very important factors when working at external sites [6] it is more desirable to use a user supplied approximation for the alignment of the data sets.
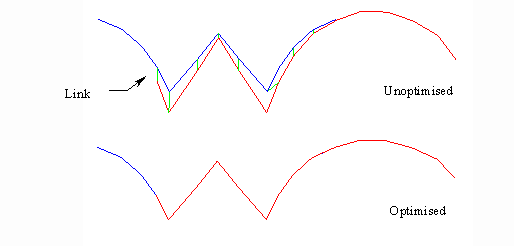
The limited accuracy of the tracker, or indeed the user specified alignment, necessitates the use of the data itself to refine the registration. This is achieved using an Iterative Closest Point algorithm [7], which refines the positions of the data sets to improve their alignment. As illustrated (Figure 3) the data points are paired off based on their orientation and position. Their positions (and orientations) are then optimised to minimise the error between the pairs. This process continues until an acceptable level of convergence is reached. This algorithm proves useful for improving the alignment of the data sets for both the tracker and the user supplied alignment.
Figure 3: ICP Alignment (synthetic data)
EXAMPLES
Figure 4 shows the profile of a voussior, taken from a collection of loose stone at Mellifont Abbey, Co. Meath. The voussoir, worked from pale oolitic limestone, measures h. 0.165m x w. 0.15m x d. 0.135m and has some small areas of damage. An entire profile was taken in about 20 minutes, of which approximately 7 minutes was spent acquiring the 12 segments (2700 points), and the remainder was spent on the registration. The rough texture of surface is clearly visible.7 Also visible are two sections of the profile where there appear to be two distinct surfaces. These are the result of chips in the stone, where some of the segments cross the chip and others cross the undamaged surface. Such discrepancies are resolved later when the data is combined into a single curve (merging).
Figure 4: Voussoir Profile (with photo)
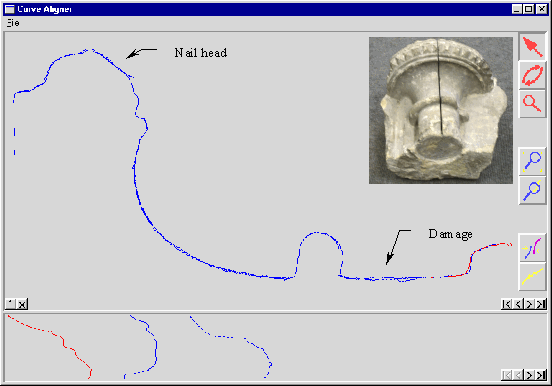
The second example (Figure 5) is a moulded capital from Christchurch Cathedral, Dublin. This example (again oolitic limestone) measures h. 0.21m x w. 0.28m x d. 0.14m and incorporates smaller features and a nail-head moulding. The resulting profile shows some loss or finer detail, especially near the nail-head. Being a slightly more complicated profile, this took 30 minutes to construct - 10 minutes for data acquisition and 20 for registration.
Figure 5: Capital Profile (with photo)
Both of the above examples were acquired with the prototype system, using a 50mm lens, which allows a 5-8cms line along the surface and operates at a range of just under 1metre. This configuration seems to be most suited for use on medium scale features, other configurations could be used for larger mouldings.
Future Work
There are a number of possible routes of exploration, which may be followed to improve usability and robustness of the system. One of these areas would be concerned with the automatic determination of the angle at which the profile is cutting the surface. At present accurate registration is reliant on the users' judgement of segment orientation. The provision of an automatic angle determination mechanism would remove this requirement and open the door to the possible use of pattern matching techniques for registration.
Another possible improvement would be the use of a wireless transmitter, or a digital camera, on which the images would be stored to be processed later. This would remove the burden of cables etc. but would also make it difficult for the user to receive feedback from the system.
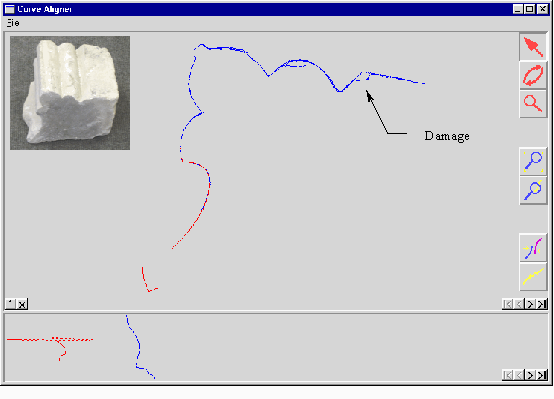
The main area of future work will be the development of a database system capable of storing the profile curves, along with text information and photographs of the actual mouldings and their contexts. This database will also be used as a reference system for a curve analysis system to provide cross-referencing capabilities.
Acknowledgements
The authors would like to acknowledge the assistance of Dr. Carol O'Sullivan and Prof. Roger Stalley in the preparation of this paper and thank them for their guidance through the continuing work. Research has been funded by Enterprise Ireland Basic Research Grant (SC/98/604) and Duchas the Heritage Service, Department of Arts, Culture, Gaeltacht and the Islands.
Notes
1 The Lasiris laser line generators use optical techniques to fan a single laser spot into a line that has even intensity along its length.
2 As the standard PAL video signal uses interlaced frames (i.e. one image for odd lines and another for even) only one or other set is used.
3 Radial distortion can be seen in photographic images, especially those taken with wide-angle lenses, where straight lines appear slightly curved.

4 The areas of the image are separated by using their intensity levels (greyscale). Calibration points are the dark areas, and the laser is the bright strip.
5 Changes in the orientation of the sensor swing a point along an arc whose radius is equal to the distance between the point and the sensor. Where d is this distance, the movement of the point is
(by cosine rule). Thus a point at 1000mm from the sensor moves by
6 The magnetic position sensor accounts for about 85% of the systems total power consumption, and consists of a system unit, a reference point and a sensor.
7 For illustrative purposes no smoothing has been applied to the data, and the segments haven't been merged.
References
1 Morris, R. (1990) 'Mouldings and the Analysis of Medieval Style' in E. Fernie and P. Crossley (eds) Medieval Architecture in its Intellectual Context; Studies in Honour of Peter Kidson, pp.239-247, London, The Hambledon Press.
2 Council for British Archaeology (1987), Recording Worked Stones: a Practical Guide, 36-7, London, Council for British Archaeology Practical Handbooks Series 1.
3 Bradshaw, G. (1999), Non-Contact Surface Geometry Measurement Techniques, Dept. of Computer Science, Trinity College Dublin, Ireland. (www.cs.tcd.ie/publications)
4 Kennedy, W. P. (1996), 'The Basics of Triangulation Sensors' Sensor Magazine, May 1996. (www.sensormag.com)
5 Tsai, R. Y. (1997), 'A Versatile Camera Calibration Technique for High-Accuracy 3D Machine Vision Metrology Using Off-The-Shelf Cameras and Lenses', IEEE Journal of Robotics and Automation, Vol. RA-3, No. 4.
6 Beraldin, J.-A. & Blais, F. & Cournoyer L. & Rious, M. & Bernier, F. & Harrison, N., Portable Digital 3-D Imaging Systems for Remote Sites Ottawa, Ontario, Canada, Institute for Information Technology, National Research Council.
7 Eggert, D. W. & Fitzgibbon, A. W. & Fisher, R. B. (1996), 'Simultaneous Registration of Multiple Range Views For Use In Reverse Engineering of CAD Models', International Conference on Pattern Recognition 1996.